![]()

| Recent Comments |
| Categories |
| Archives |
| Tags |
Compression
Compression is perhaps one of the most difficult audio processors to master. It may take a long time before you are able to hear the (subtle) effects of compression. I am not claiming that I am there yet, but I think that over the past decade I have improved my ability to use compressors and to hear more of their effect. In this post I am not going to provide a detailed explanation about compressors since there are plenty of resources out there. Instead, I will provide some tips to use compressors that I have learned from others. These tips are, however, far from complete given the many applications of compressors. And, you can of course follow your own approach.
Basically, a compressor is nothing else than an automatic volume knob. Compressors can be used for creative effects but are generally used to control the (micro)dynamics and the dynamic range (volume) of the audio. However, they can also modify the dynamics at longer time scales (e.g., notes, bars, phrases), modify the character of the sound, create punch, and to allow softer instruments to compete effectively in a mix with louder ones.
Assuming you are familiar with compressors, I will directly start with several procedures to set up a compressor that have worked for me and, subsequently, explain some more general stuff. Hope you find some use for this post. Let me know.


Image: the SSL G-Bus compressor (hardware and the software plugin) with typical controls for a compressor: Threshold, Ratio, Attack, Release, and Makeup gain. This compressor is a so-called VCA (voltage-controlled amplifier) compressor. This is an analog compressor that utilizes a VCA control to apply compression. The input signal is split through an integrated circuit into a detector path (to control the VCA compression) and an output path.
Acknowledgements
Part of the information (text, tables, and figures) in this post is copied from internet resources and from several books about mixing and mastering that are on my bookshelf. In particular:
- Michael Paul Stavrou (2015) Mixing with your mind: Closely Guarded Secrets of Sound Balance Engineering Revealed. Flux Research, Mullumbimby
- Bob Katz (2002) Mastering Audio. The art and the science, Focal Press, Canada.
- Hans Weekhout (2021) Muziekproductie. Opnemen, mixen, en masteren, 4de editie, Django Music & Publishing.
- Wessel Oltheten (2018) Mixing with Impact – Learning to Make Musical Choices, Taylor & Francis Ltd
No permission was obtained for from the copyright holders to use information from their books. However, since very small part of the original works was used (fair use?), and by referring to the authors/books I hope to get away with this ;-).
However, I fully acknowledge and appreciate all contributions from the various internet sites and books and used.
How to setup an compressor?
General
- If you compress the loudness of the audio may change. Since we perceive louder as better, make sure to adjust the makeup gain such that the volume before and after compression is the same;
- You can use multiple compressors (serial compression) to divide the workload among these compressors to avoid that artefacts (e.g., pumping, distortion) are being produced in case you have one compressor working to hard;
- If you increase the attack time then not only more transients will pass before the compression starts to work, but this also allows more of the lower frequencies to pass. Thus, with increasing attack time might hear more lower frequencies. But now always! With short attack times and make up gain you bring up the sustain part of the sound which may increase the amount of lower frequent sound;
- Release time is probably the most influential parameter affecting the sound of the compressor;
- Following the advice of Bob Katz in his book Mastering Audio:
- Never trust the gain reduction meter but use your ears;
- Too fast attack/release times can distort the signal (because the compressor then follows the low frequency waveform and not the overall envelope of the music).
- Compressors can increase ‘punch‘ and ‘snap‘ (see below for a definition);
- There is no single compressor that is up to all tasks. Different compressors have different properties (see below), thus select one that most suits your task at hand.
Mastering
- From Bob Katz in his book Mastering Audio:
- Digital compressors for mastering (thus, on the stereo mix) use attack times ranging from 30 to 300ms (or longer on occasion) with an average of 100ms. To set the attack time, listen to the percussive and transient quality of the music: shorter attack times soften the transients and produce a more “closed” sound. Longer attack times let the music breathe;
- Typical release times in music range from 50 to 500ms with an average of 150-250ms;
- Start with a very fast release time of 100ms and a very high ratio of 4:1. Then adjust the threshold until the gain reduction meter bounces as the ‘syllables’ you want to effect pass by, and you hear this bounce (this ensures that the threshold is placed optimally around the musical accents you want to manipulate. Then reduce the ratio to very low (e.g., 1.2:1) and increase the release to about 250ms. Then listen and fine-tune the attack, release, ratio, and threshold. If you want a more ‘punchy and aggressive’ sound, then shorten the release (and attack if useful). The objective is to put the threshold in between the lower and higher dynamics to alternate between high and low (or no) compression;
- Alternatively, compress as inaudibly as possible: use a very low ratio (e.g., 1.01 to 1.1) and a very low threshold (e.g., -30 – -40 dBFS). This gives a gentle continuous macrodynamic reduction;
- The advantage of a multiband compressor is that one band will not affect the second band. Thus, a vocal will not reduce the bass drum (or vice versa). Compressing the high-frequencies makes the sound duller as it gets louder. You can use this to sweeten the harshness of digital recordings, to soften distortion that gets harsh at increased volumes, or sweeten bright cymbals;
Control of dynamics
- From the book Music Production(Hans Weekhout) the following procedure is proposed to control dynamics:
- First exaggerate the compressor by taking a large ratio (10:1 to 20:1) and a low threshold because allows you to better hear the compressor working when setting the attack and release time;
- Set attack halfway;
- Set release to maximum. A long release prevents the compressor of going back to the initial (normal) audio level and, consequently, the compressor is continuously compressing the audio. Next, slowly reduce the release time until the audio starts to ‘breath’ and the gain reduction meter is moving rhythmically. The gain reduction meter should regularly return to zero (no compression);
- Next choose the attack time. A too fast attack time results in notes/words that are to aggressive (spikey) because part of the transients will still pass and the (initial part of the) sustain will be compressed. Note, a very fast or zero attack time will compress all transients and will bring up the sustain (due to the make up gain);
- Finally set a lower ratio and threshold;
- The compression should not be more than 2 – 6 dB.
For vocals this mild compression leads to a compacter sound that keeps attention and makes every work intelligible. It will also makes it more easy to fit the vocal in the mix.
Going for a ‘musical’ setting
- The next procedure is taken from Mixing with your mind (Michael Paul Stavrou). This approach works very well for me.
-
- First we set the all controls to temporary values and then focus on one control at a time
- Attack time to anywhere;
- Release time to minimum (a fast release lets you hear more individual transients than a slow setting);
- Ratio to maximum;
- Threshold to sensitive;
- Next, adjust only the attack time and listen to the leading edge (transient) and the sustain part of the sound (neglect the pumping caused by the fast Release time). If the attack is on a slow setting then the transient is much ‘thicker’. Set the attack to your liking;
- Next adjust the release time to become a musical component. Try to set it as slow as possible such that the compression envelope ‘ bounces back’ to reinforce (or establish) the groove of the music. Thus, don’t set the release to fast just to hear something buried behind the sound!
- Now reduce the ratio as much as possible without loosing the effect(s) you created with the attack/release time settings. The higher the ration, the smaller the sound. However, with lower ratio’s you have less control (less contained). Thus, try to have it sound big, but still in control;
- Finally, adjust the threshold. It is important to set the threshold such that it is not compressing all the time. Having uncompressed sound at appropriate musical moments adds color and contrast to the sound. For example, permit the dynamic movement (i.e., the compressor) to come to rest in some quieter moments.
- First we set the all controls to temporary values and then focus on one control at a time
Vocal compression
From the book Music Production(Hans Weekhout):
- Control dynamics.
- Low vocals are often more dynamic than high vocals. In addition, low vocals often respond better to the harmonic distortion of vintage compressors. So you can usually compress low vocals more (6-12dB) at a ratio of 4:1 – 8:1, or more.
- Because high, loud vocals are usually less dynamic, you can suffice here with less compression. A few dB of gain reduction at a ratio of 3:1 – 4:1.
- Punch and aggression
- To add punch and aggression you can add a second compressor for more intense compression with, for example, the 1176 (requires a good adjustment of attack and release).
In addition, I found some advice about the attack time. The fast(est) attack potentially gives a problem. The compressor reacts first when it got a signal (it can’t look in the future; unless there is a ‘lookahead’ function). So it got the first transient and then starts leveling down (fast but not backwards). That’s why it “kicks” short. It is a famous beginner mistake. Make it not as fast as it can… make it “relaxed” and pull down the input.
Compressor background information
Types of compressors
- Optical
- Principle: compressors typically split your input signal into two parts: One is sent through a detection circuit, which determines how the compressor will act, and the other is the audio that’s operated upon by the compressor and sent to the output. In an optical compressor, the detection circuit is unique; the audio signal is turned into light, which triggers an electro-optical sensor that governs the amount of gain reduction.
- Characteristics: Slow attack. Fast initial release that then slows down. Smooth and transparent/light coloring. Soft knee
- Example: Teletronix LA-2A
- Application: Instruments and mix. gentle (easy-going) purposes.
- VCA (voltage-controlled amplifier)
- Principle: VCA is an acronym for “voltage-controlled amplifier,” which is the component at the heart of the circuitry in this type of compressor. A VCA compressor reacts to peaks that are above the user-set threshold. VCA compressors are known for having fast response and are therefore a good choice on peaky, rhythmic or transient-heavy material. These type of compressors utilize a VCA control to apply compression. The input signal is split through an integrated circuit into a detector path (to control the VCA compression) and an output path.
- Characteristics: Slow initial release that then increases (more aggressive sound).
- Examples: API 2500, dbx 160, SSL G-Series bus compressor.
- Application: Mix. VCA compression is meant for clean, transparent mixing (doesn’t add warmth/color) where you want control over a large range of parameters. Compressing drums, percussion and other transient-heavy sources. Adding punch Smoothing out peaks in a transparent way—for example, restricting the dynamic range of a vocal or instrument performance without squashing transients Bus compression. Virtually any compression task, because they’re so versatile.
- Delta-Mu (trademarked by Manley as Vari-Mu)
- Principle: a tube compressor where the circuitry achieves its attenuation (mu) through re-biasing of the tubes.
- Characteristics: gentle attack/release times (‘creamy’ sound). Smooth compression with warm and pleasant light coloration. Ratio varies with level. Soft knee. Preserves microdynamics and transients, but affects the macrodynamics.
- Examples: Fairchild 670
- Application: Instruments and mix.
- FET (Field Effect Transitor)
- Principle: like the VCA, FET compressors are solid state but use a particular kind of component called a “field-effect transistor,” which was designed to emulate the behavior of tube circuitry. Many FET compressors have no threshold control. The amount of compression applied is governed by the combination of the amplitude of the input signal, and the setting of the input level control. The louder the input, the more signal gets compressed.
- Characteristics: very fast attack times (micro seconds). Coloration.
- Examples: UREI 1176
- Application: Instruments. FET compression is better suited for aggressive and heavy sounds like electric guitar and drums.
- Pulse Width Modulation (PWM)
- Principle: utilizes pulse width modulation to effectively alter the amplitude of the input signal, thereby compressing it.
- Characteristics: very fast attack and release times; Very transparent.
- Example: Great River PWM 501 500‑series Compressor.
- Application:
- Compressors that do not emulate an existing analog compressor
- Principle: digital compressor (plugin).
- Examples: Unisum, FabFilter Pro C2, and many others.
- Application: Instruments and mix.

Table. Compressor types. This table was copied and translated to English from Mixing with Impact (Wessel Oltheten).
Attack, Decay, Sustain and Release (ADSR)
The envelope of audio waveforms roughly have four parts: attack, decay, sustain and release. The first part of the envelope is called the attack. How long it takes to go from silence to the maximum volume. A drum and a piano usually have short attack times. The next section is called decay. During the decay section the amplitude would decrease from the maximum level to some constant level. Drums have short decay times; a piano might have a slightly longer decay time and a horn longer still. The sustain level is a constant level that the sound maintains during the middle part of the sound. The final part of the envelope is called the release. The release time is the time it takes the sound to fade from the sustain level to silence.

Figure: ADSR envelope when pressing and releasing a key on a piano. Copied from SkyTracks.
Transients
A transient is a high amplitude, short-duration sound at the beginning of a waveform (sound). The loudest of transients are things like drum hits where the crack of the stick on a drumhead sends a loud sound wave out to the microphone. Transients are everywhere though – from the pick attack on your guitar strings to the consonants of your vocal. Transients are essential to articulation.
![]() Figure: transients at the beginning of a sound. Copied from [here].
Figure: transients at the beginning of a sound. Copied from [here].
Typical compressor controls
- Threshold: the amplitude limit that dictates when the compressor will engage and disengage;
- Ratio: the ratio of input signal amplitude above the set threshold to the output signal amplitude above the threshold. For example, with a ratio of 2:1 a sound that is 6dB above the threshold will be reduced to 3dB;
- Attack: the amount of time it takes for a compressor to get full gain reduction once the input signal amplitude surpasses the threshold. For example, attack times may range from very fast (e.g., 0.005ms) to very slow (250s) on the FabFilter C2;
- Release: the amount of time it takes for the compressor to return to unity gain (to stop attenuating the signal) once the input signal drops below the threshold. For example, release times may range from fast (10ms) to very slow (2500ms) on the FabFilter C2;
- Makeup gain: the amount of gain (or attenuation) to increase/decrease the volume.
Note that some compressors may have (many) more controls like the knee, hold, dry/wet, sidechain, etc.

Figure: Envelop showing the effect of threshold, attack/release on the audio output level. The ratio (not shown) controls the amount of gain reduction. No make-up gain applied. Figure copied from SoundOnSound.
Time scales
To understand compressors, I believe it is good to have some notion of the time scales involved. A few examples are shown in the next few figures.

Figure: This waveform shows three kick drums within one second. One kick lasts approximately 300ms.

Figure: Enlarged waveform of the first kick (length about 300ms). The transient occurs within the first 20ms. Thus, a short attack time of 10ms will still pass part of the transient.

Figure: One hit on the snare (top). Total length about 60 ms. Transient occurs in about the first 10-15ms.

Figure: This waveform shows three words from a vocalist. The length of one word is about 500ms.

Figure: Enlarged waveform of the first word from the vocalist. The transient passes in about 60 – 80ms.
 Figure: Enlarged waveform of two words in a full mix shown by the occurrence of the two ‘peaks’ with a length of about 15ms.
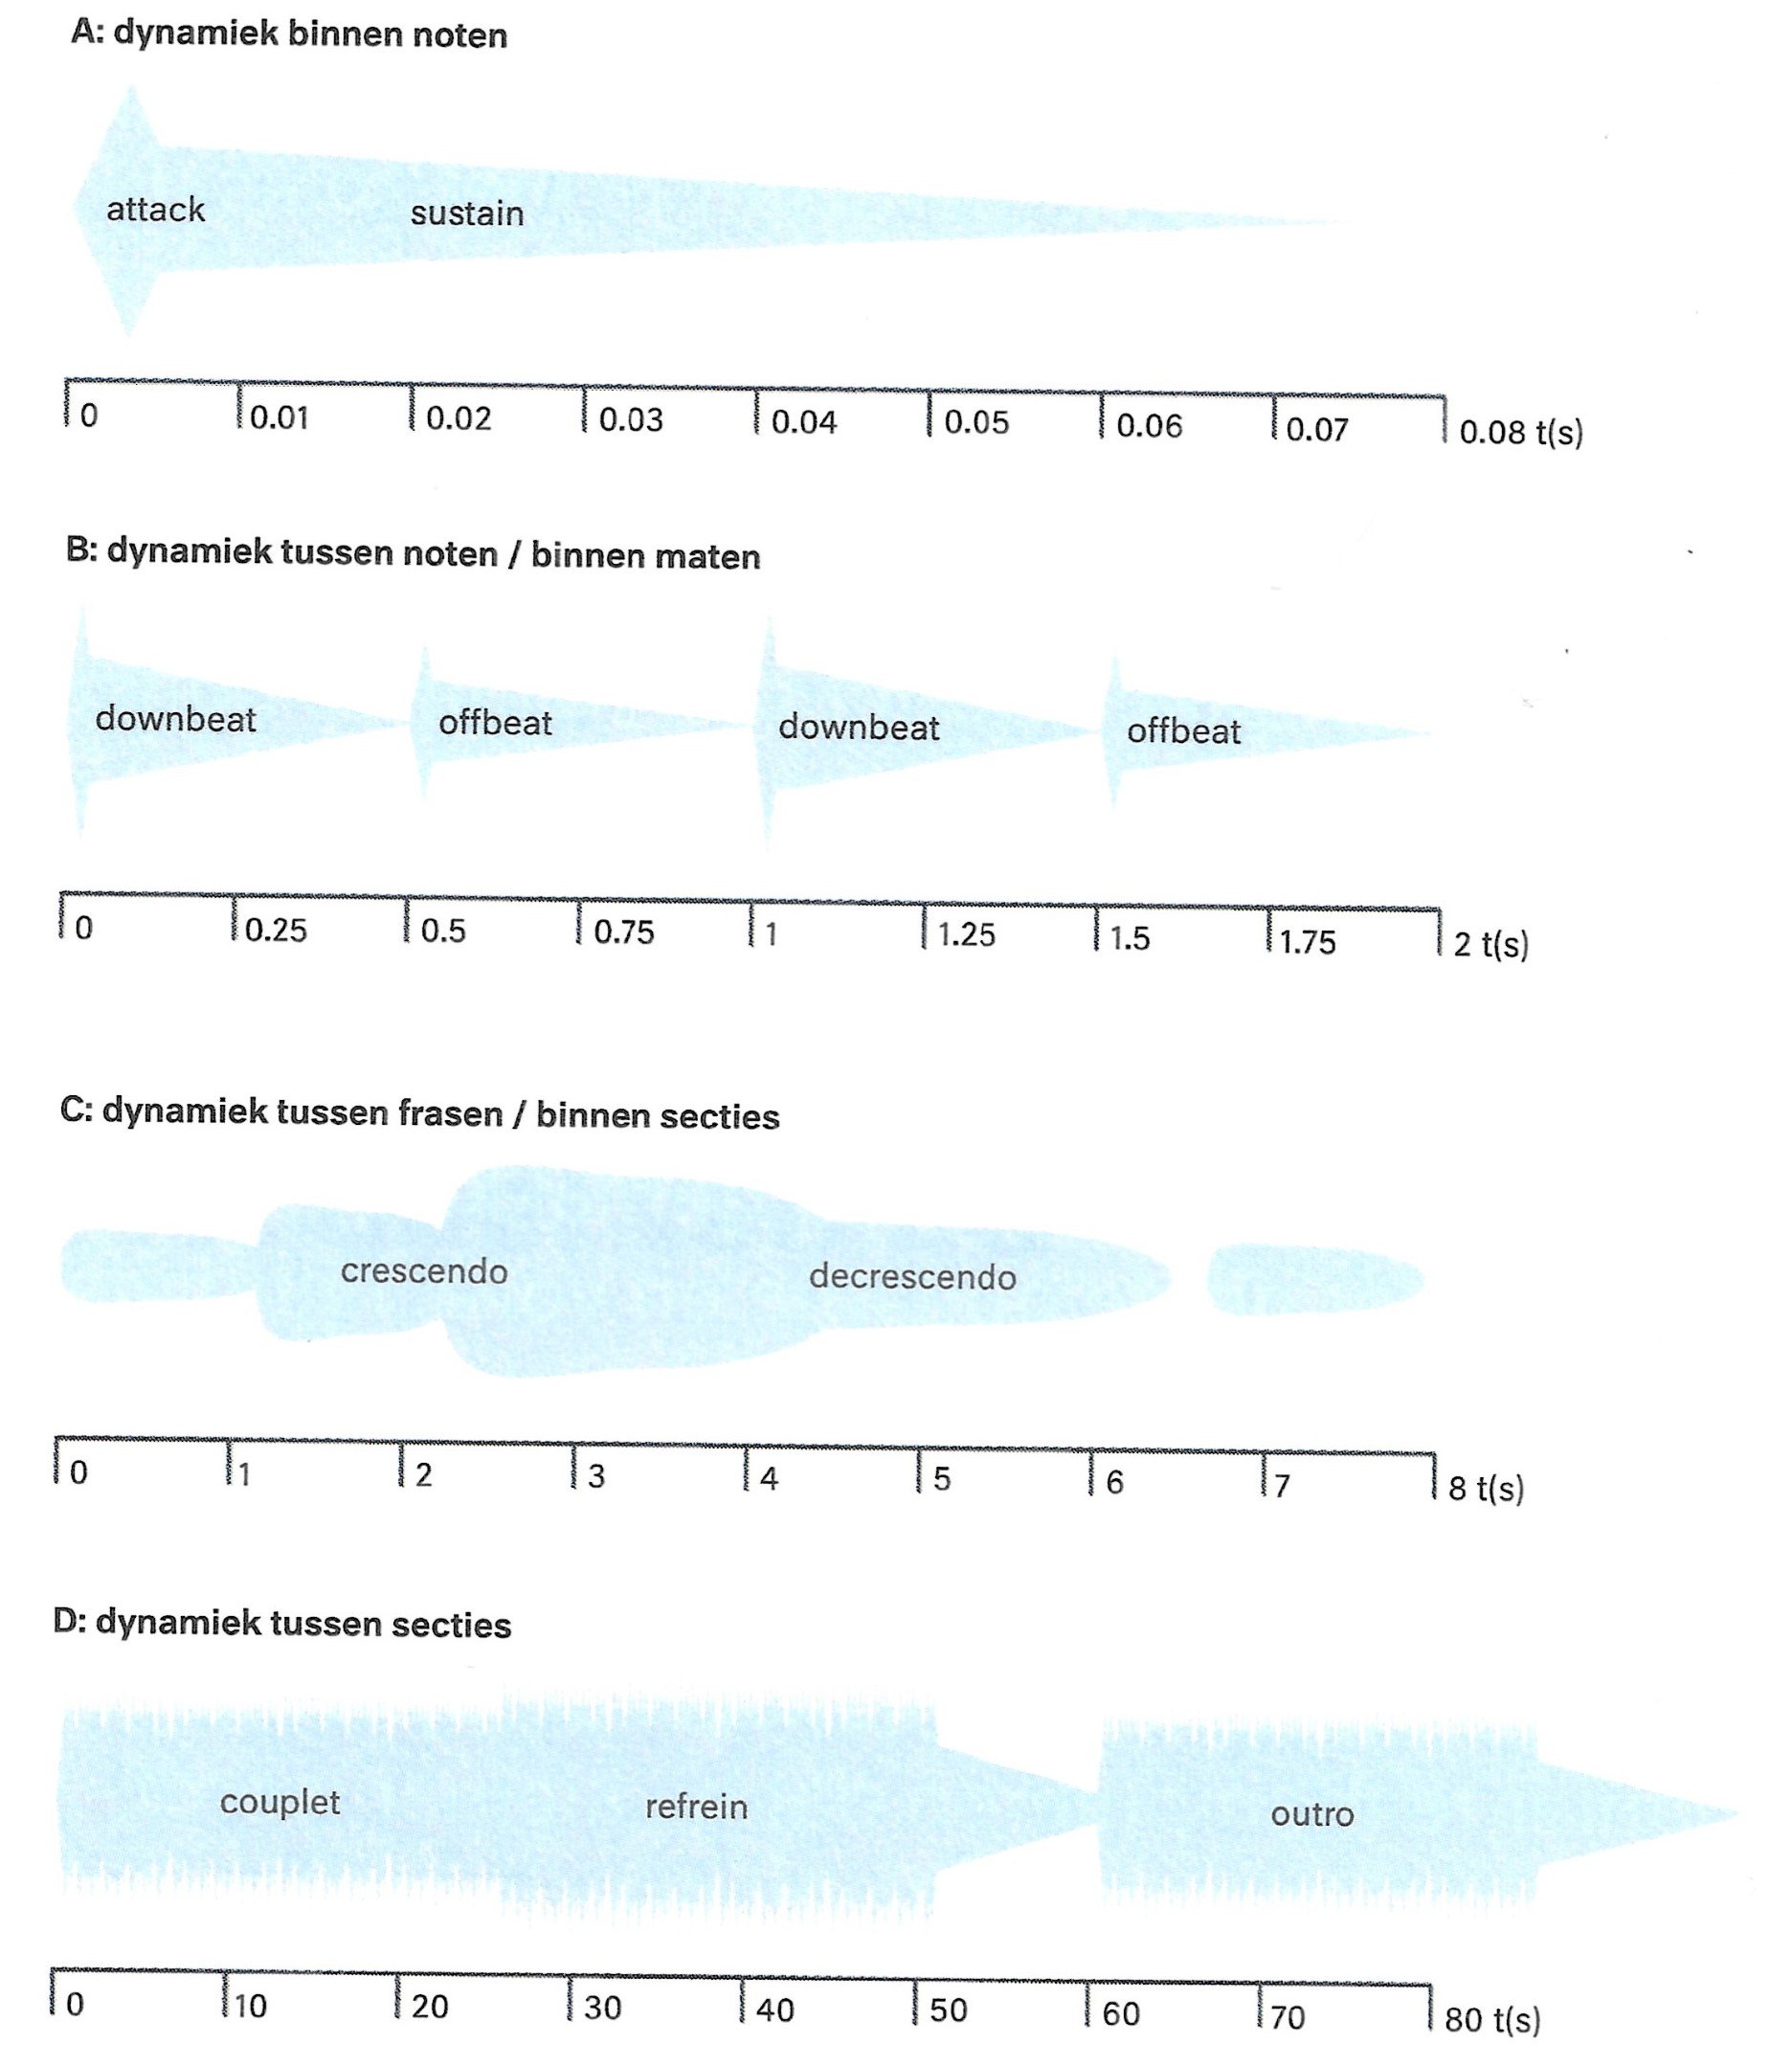
Figure: Dynamics at different time scales of a song. Figure copied from Mixing with Impact (Wessel Oltheten).
Punch and Snap
Compressors can increase ‘punch‘ and ‘snap‘. However, these are not a really well-defined terms. See [here]. Punch mostly it seems to be about bringing up the mid-range frequency levels. Both can be addressed during mixing and mastering.
Bob Katz in his book Mastering Audio says the following: “So in general, the less the amount of limiting and the longer the attack time of compressors, the snappier the sound will be. Snap is the important companion to punch: a good engineer needs to concentrate on both attributes. We could call the sound of the beater of the bass drum its snap, and the resonance of its diaphragm and body its punch.
- Snappy reflects the presence of transients and micro dynamics in the sound – snap is very short upward-moving dynamic contrast that is so short-term that it is not perceived directly as a loudness increase, although it contributes to the partial loudness and the liveliness.
- Punch is dynamic contrast that is definitely perceived as a momentary loudness increase. A popular way to create or enhance punch is to push the level dramatically into a compressor with a fairly-short attack time and fairly- fast release, which increases the sound power and sustain during its release phase. In order to continue to be effective during moments when punch is being applied, the level has to dip just a little each time in order for it to come back up and “hit you”.
Not everyone is skilled at creating punch: if not well-done, the sound becomes wimpy loud.”
“Punch can be retained and sometimes improved when their attack and release times are optimized to permit both transients and sustained sounds while maintaining or enhancing the overall dynamic shape of the song”.
In the book Mixing with Impact from Wessel Oltheten there is the following explanation:
“A common statement is that someone is going to add punch with a compressor. The secret is that you know that the first onset of a note, the transient or attack, is the most important for the punch. By giving the compressor a fairly slow attack time, it will adjust the relationship between the onset of the note and the sustain part of a note. It lets the attack pass and lowers the sustain. As a result, the sound gets proportionally more onset: more punch.”
Thus, Bob Katz emphasizes the importance of the sustain part for punch, while Wessel Oltheten seems to emphasize the attack part (but perhaps depends on definition of onset). Yet, with respect to the attack time, they say the same. For me ‘punch’ is about decreasing the ratio between the attack and sustain (thus, in agreement with the explanation of Bob Katz).
What else is there to learn about compression?
- Downward/upward compression, and downward/upward expansion;
- Multiband compression;
- Serial and Parallel compression;
- Sidechaining;
- Soft/hard knee;
- Lookahead (allows attack times of 0 ms). (e.g., FabFilter Pro C2)
- Feedback and feedforward compressors;
- RMS vs (quasi) peak response;
- Mid-side (MS) compression;
- Gain (fader) riding as alternative to compression (for macrodynamics);
- Editing the waveform as alternative to compression.
Gallery of famous hardware compressors

Image. Fairchild Dual-channel 670. The most expensive compressor in the world; at 30 kilograms it’s certainly the heaviest; contains 20 valves. The term vari-mu here refers to the way in which the compression ratio changes dynamically in response to the signal level. The result is a unique form of soft-knee compression which responds differently depending on the type of signal which is fed into it. Photo copied from SoundOnSound.
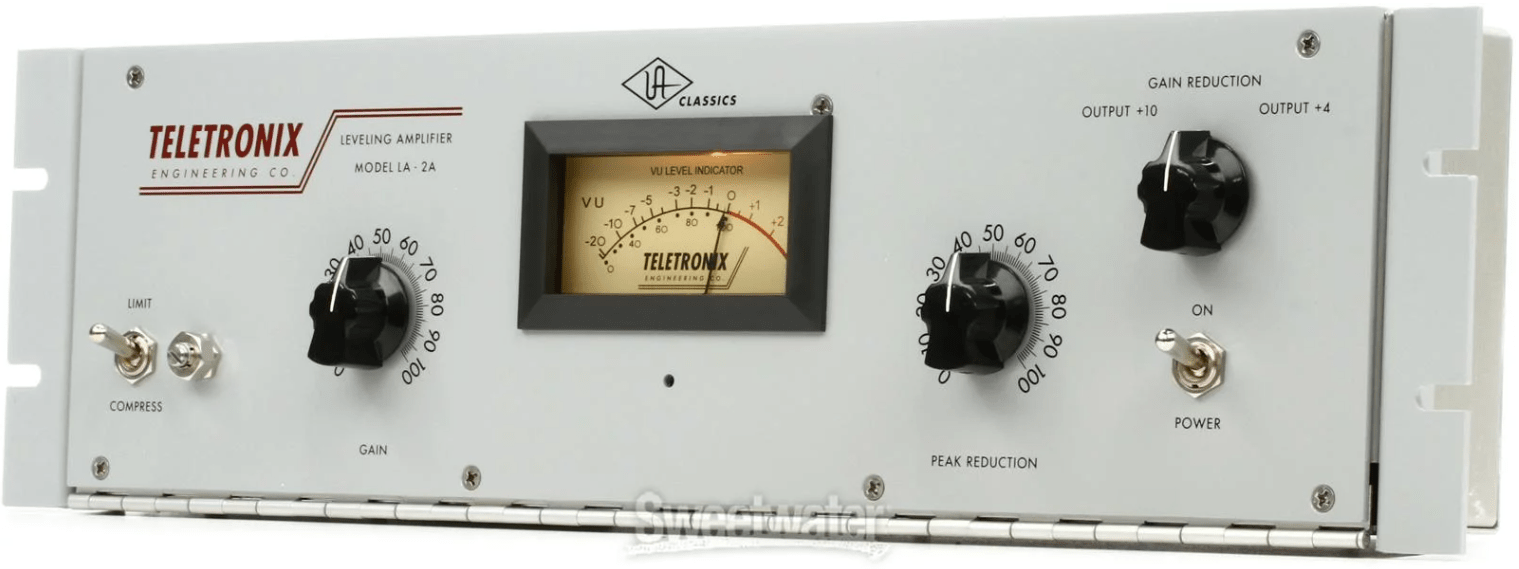 Image. Universal Audio Teletronix LA-2A (Gray face). Tube-driven electro-optical attenuator system that allows instantaneous gain reduction with no increase in harmonic distortion.

Image. Universal Audio Teletronix LA-3A. Marking a departure from the valve design of the wildly successful LA-2A, the LA-3A, debuted in 1969, combines the UA transformers from the 1176 with the electro-optical attenuator (solid state) of the LA-2A to offer a unique sonic signature. Where the LA-2A does warmth and color, the 3A does rich, hi-fi punch – particularly in the lower-mids.

Image. Universal Audio 1176. The main selling point of the all-solid-state (FET) device was its ultra-fast attack time – a startling 20 µs. There are multiple revisions of this compressor each having its own sound characteristics (Bluestripe, Silverface, Blackface). See also SoundOnSound and [here].

Image. API 2500. There are some compressors that have a wide application and some that do one thing very well. The API 2500 is in the latter group, which is all about bus compression, either on the full stereo mix or a drum sub-mix. In many ways the American equivalent of the classic SSL Buss compressor, the 2500 is known for its ability to shape the punch and tone of full mixes.

Image. SSL G-Series bus compressor. The G-Series Bus Compressor is a VCA-based stereo unit from the Solid State Logic, derived from the circuits found in their legendary 4000 G-series console. The SSL excels at one thing only: stylish-as-hell bus compression, either on sub-mixes or the master bus itself. For ‘glue’ purposes, it reigns pretty much supreme: a holy grail compressor that does both transparency and glue with panache: making a mix louder and punchier while imparting an expensive modern-sounding cohesiveness. Photo from SoundOnSound.
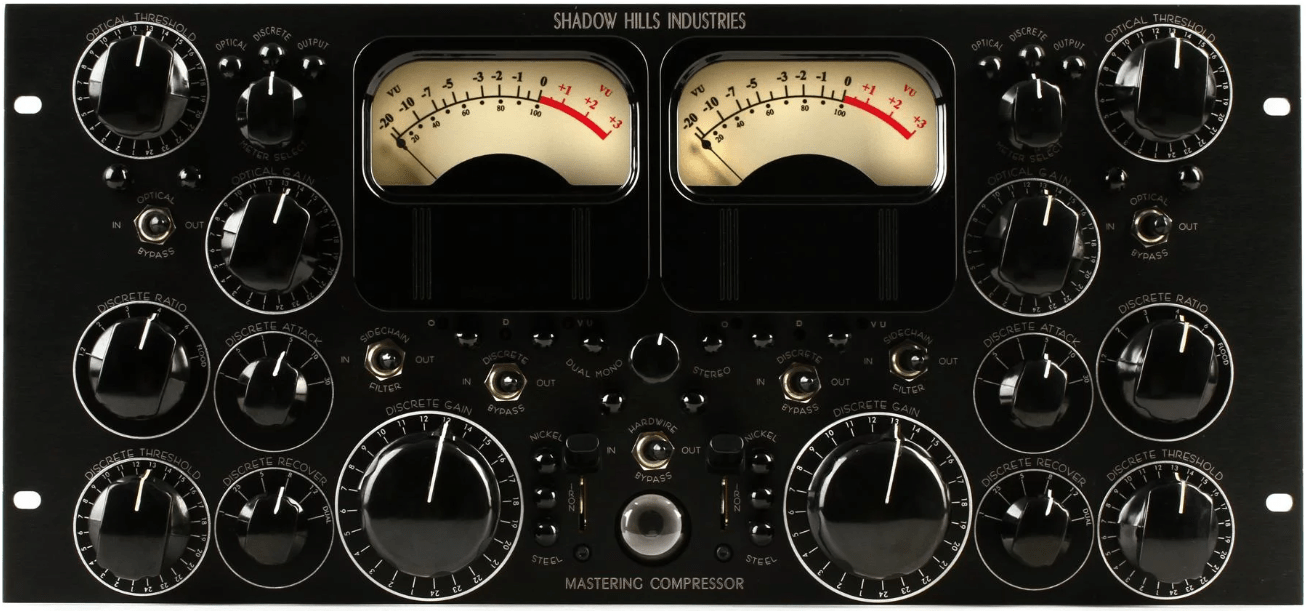
Image. Shadow Hills Industries. Mastering compressor. Image. Two compressors in series, per channel that can act in stereo, or dual mono. The unit’s first compressor is an optical compressor that has a set 2.1 ratio. It is then followed by a VCA compressor. There are six ratios: 1.2:1, 2:1, 3:1, 4:1, 6:1, Flood (past infinite). There attack settings: 0.1, 0.5, 1, 5, and 10 milliseconds, six release times selectable: 0.1, 0.25, 0.5, 0.8, 1.2 and Auto. There are 3 transformer options to choose from. Nickel, which adds a nice top end sparkle. Iron which adds a little character in the mid’s, and steel which adds additional harmonic distortion. There are bypass switches for both compressors, and stepped controls that click to the specific setting to obtain precise settings as well as stereo link mode.

Image. Weiss DS1-MK3. The DS1-MK3 is a full-band digital compressor, limiter, and de-esser with M/S mode and parallel compression facilities. It has 24bit digital input, internal 40bit floating point arithmetic, dithered output for 16bit, 20bit or 24bit word lengths. Its AES/EBU interface accepts up to 96kHz sampling, and at 44.1 kHz and 48 kHz it internally samples to double rate, reducing or eliminating the harsh aliasing distortion that gives digital compressors a bad name. See [here].
Plugins
Here is a list of compressors that I use often
- Mastering
- Shadow Hills Mastering Compressor Class A (Brainworkz): Optical + VCA
- Unisum mastering compressor (ToneProjects): no hardware equivalent
- Weiss DS1-MK3 from Softube: Digital compressor. (based on the Weiss DS1-MK3 digital compressor, and has exactly the same software). I tried this compressor and it sounds great. See also Going Weiss.
- Mixing
- Native Bus compressor 2 (Solid State Logic): VCA
- Pro-C2 (FabFilter): not based on a specific hardware compressor
- Universal Audio
- 1176 Classic Limited Collection (Rev A, Rev E, AE compressors; see [here])
- Teletronix LA-2A Leveler Collection (LA-2, LA-2A Gray, LA-2A Silver)
- Fairchild Tube Limiter collection (Fairchild 670, Fairchild 660)
- dbx 160 compressor
- Empirical Labs EL8 Distressor
- Note, following the recent attempt from Waves to transfer to a subscription-only model (see [here]), I have replaced most of the Waves compressor plugins with the plugins that were developed by Native Instruments together with Softube. However, the aforementioned UAD are currently my favored choices.
Videos
Compression explained with the Weiss DS1-MK3 compressor:
If you have the time, then this is an excellent 10 hour video about compression from mastering.com:
References
- Visualization of compression.
- 20 best hardware compressors
- Classic Compressors (Sound on Sound)
- If you want to train your ears to hear the effects of compression then consider SoundGym.


