![]()

| Recent Comments |
| Categories |
| Archives |
| Tags |
Solutions to stream your DAW, music, microphone, (and video).
If you want to stream your DAW (e.g., Cubase) session, or a tutorial (like my Reaper tutorial), or other audio over the internet there are various free and commercial solutions. By it self, is not too difficult but you run into problems if, at the same time, you want to use your microphone (and video). In addition, I frequently receive questions about how to best stream audio/speech (via Zoom) over the internet. Below, I explain several possibilities to configure your computer for streaming. If you have better options (or corrections to this post) then let me know in the comments.

Streaming solutions
Please note that I do not have experience with each of these software tools. The software I currently use or have used is indicated with an asterisk (*). If you have experience with any of this software, please feel free to leave a comment.
- Audiomovers
- *ListenTo (stream via browser; also used by Sound Education Nederland; subscription required)
- *OmniBus (virtual patchbay)
- *SonoBus: high quality network audio streaming (free; works directly as a plugin within DAW; integration with OBS)
- *Open Broadcaster Software (OBS)
- Jamulus. (more difficult to integrate with a DAW; may not sound good)
- Satellite
- Jamkazam
- SessionLink Pro
- *Steinberg VST Connect
- ASIO Link Pro
- Jack Audio Connection kit
- PulseAudio
- PipeWire
- SessionWire
- *Waves Stream
- *Zoom + OmniBus
In addition to these applications, there exist tools like *Virtual Audio Cable and *VoiceMeeter from VB-Audio, or Jack Audio Connection kit, PulseAudio, and PipeWire that help to setup more complex audio configurations and also may facilitate your streaming setup. However, if you have the money, then OmniBus is a better substitution.
This posts assumes that you are a Microsoft Windows user. Currently, I am using Microsoft Windows 10 on my Studio Computer, but the general principles will also apply to Mac computers.
Audiomovers
If you don’t want to bother with all the technical issues required to setup your streaming and can spend some money, then the Listento product from Audiomovers is probably the way to go. It requires a subscription to use (currently, $99.99/year for a maximum of 10 listeners). It is very easy to setup and allows you to stream your audio in different qualities up to 32bit/96 kHz using the Web Transmitter in your (Chrome) browser. Alternatively, you can use a plugin for your DAW to stream directly from your DAW, or use the Desktop app. You can stream high-quality audio through a web-browser while at the same time being in a Zoom/Teams/etc session (thus, the audio is not streamed through these video applications). A drawback is that a Zoom recording will not capture the audio from whatever you stream through the transmitter.. For more advanced applications you can also stream MIDI, and Sync Video and Audio Playback with MTC.
To setup the streaming for your DAW with Audiomovers:
- Make sure that the Zoom speakers are routed to a different stereo output because otherwise the speech of the recipient will be streamed back to him, resulting in an annoying echo at his site. In my case, the main output of the DAW is routed to OUT 1 and 2 on my X32. Therefore, I route Zoom to OUT 3 and 4. All four channels I route to a mix bus that outputs to my studio monitors and/or headphones.
- In the interface of the web transmitter I select channel IN 1 and 2 to be streamed (this corresponds to the output of the DAW).
- If you have SoundID or a similar program on your DAW output channel then this should be disabled because you don’t want to stream ‘corrected’ audio to the recipient.
- Finally, ensure that the recipient has a sufficient volume, the volume level of the IN 1/2 recording device is set to a maximum in Windows:
- Navigate to Control Panel > All Control Panel Items > Sound.
- In the popup, go to the Recording
- In the Recording tab, click on the Microphone option and select the Properties button below.
- In the new popup, move to the Levels
 The Web Transmitter in Chrome
Configuration of Zoom and Omnibus for streaming
Alternatively, you can use OmniBus, which allows to route audio to any video conferencing program (e.g., Zoom, Teams, etc). It requires a bit more of configuration but it is possible. I tried streaming Cubase audio together with my microphone (Rode NT-USB Mini) and this worked remarkably well in terms of sound quality. First, you need to configure Zoom correctly (see Configuration of Zoom for streaming below). Next, in OmniBus, route your source channels—namely the microphone (“RODE NT”; orange) and the Cubase output channels (in my case “X-USB ASIO Driver” channels 1 and 2; cyan)—to the destination channel, OmniBus Virtual I/O (“Inputs (OmniBus)”; green). In the Zoom settings, you select “Inputs (OmniBus”) as your microphone input. Preferably, you do not send your Cubase output to channel 1 and 2 (as in this example) since this will also have all sound of Windows and other applications (unless this is what you want). In the Cubase ‘Audio Connections’ or ‘Control Room’ you can configure alternative destinations.
Note: in OmniBus you can select any application (e.g., Chrome) as an input source to directly route its audio to an output destination such as “Inputs (Omnibus)”. However, this does not work for applications that use an ASIO driver such as Cubase, WaveLab, and Dorico. Therefore, if you add Cubase as an input source you will find that there will be no signal coming from this source. The Yamaha Steinberg USB ASIO driver from my Yamaha MODX synthesizer seems to by my current exception.


Image. Routing my RODE NT microphone and Cubase (audio interface channel 1 and 2) to “Inputs (Omnibus)”, which serves as the Zoom input device.
Alternatively, you can set the ASIO driver in Cubase to “ASIO Omnibus A”, which can then be routed to “Inputs (Omnibus)”. The main advantage of this approach is that it allows routing to any of the 128 channels provided by the ASIO Omnibus A driver. The drawback, however, is the increased output latency.
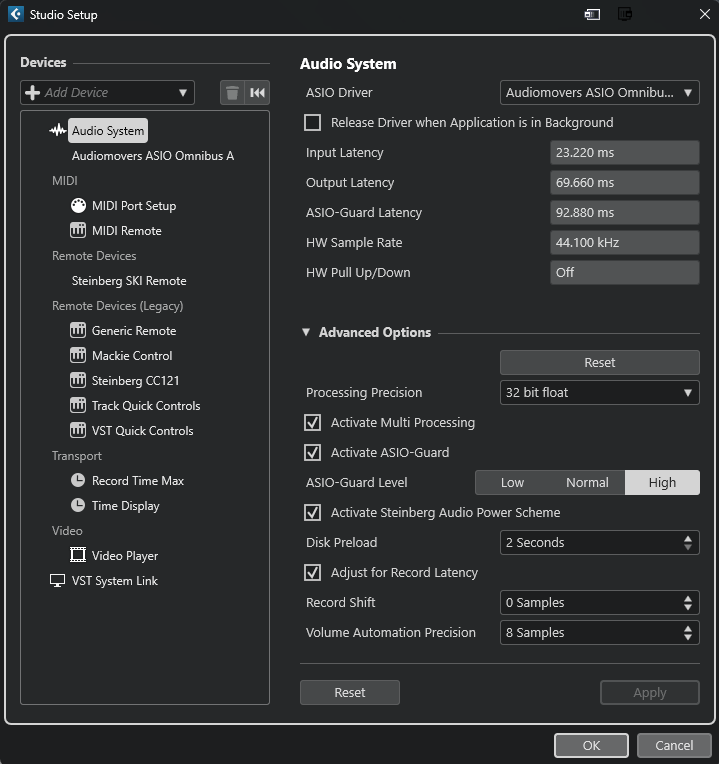
Image. Setting the ASIO driver to the native ASIO Omnibus A driver in Cubase Studio Setup.
Computer audio routing for normal applications (using a single audio interface)
Figure 1 shows the basic audio configuration for Microsoft Windows (probably similar for mac users) when using an external audio interface. In my case, I use the Behringer X32 digital mixer, which as an 32in/32out USB audio interface internally. Anything connected to the physical inputs (e.g., microphone) of the X32 will go through an analog-to-digital convertor (ADC) and is send out over the digital output (USB-B) over one of the 32 digital signal IN channels. Similarly, anything send over the digital input (USB-B) will enter the mixer as one of the 32 output digital signals to the mixer and may eventually be converted to an analog signal by the digital-to-analog convertor (DAC) and routed to a physical output (e.g., studio monitor). A loopback can be activated such that the digital Signal OUT is directly passed to Digital signal IN. In my current configuration this loopback is only active for the first 8 channels.

Figure 1. Basic audio configuration for Microsoft Windows when using an external audio interface
The X32 audio interface is connected to my studio computer Running Windows 10. Within Microsoft Windows 10 we have the Sound Control Panel (mmsys.cpl) that shows the Playback and Recording Devices (Figure 2). For each Playback and Recording device one can set the bit resolution (16 or 24 bit for OUT 1-2) and the sampling rate (only 44.1kHz for OUT 1-2). These can be left to their default values but to save bandwidth during streaming you may low the bit resolution and/or sampling rate of the devices you use.


Figure 2. Windows Playback and Recording devices showing few of the inputs and outputs of the X32. Properties are shown for the X32 OUT 1-2 device.
In my case (Figure 1) the Recording devices include the various X32 Digital output channels (I only show IN 1 – 4), the UR44C IN, (which by default is the stereo channel 1 and 2), my Rode USB microphone, and the Virtual Cable and VoiceMeeter. The Playback devices include the X32 Digitial input channels (OUT 1-2, OUT 3-4; yes, the nomenclature is confusing), the UR44C OUT 1-2, Speakers in the computer screen, and the Virtual Cable and VoiceMeeter.
Any audio application will make use of the Recording and/or Playback Device. For example, I have configured Cubase to use inputs and outputs of the X32 audio interface. Consequently, Cubase will see 32 input channels and 32 output channels. Consequently, in Cubase I can record whatever is attached to the physical inputs, and I can playback to any of the X32 channels. Most Windows applications (e.g., Mediaplayer) will use X32 IN1-2 and X32 OUT1-2 by default unless this default is changed in the Sound Control Panel, i.e., you cannot select a specific input/output from the application itself.
Note that it is little bit more complex than this but for sake of argument I didn’t want to make the figure more complex. But the “full” story is that MME, WASAPI, and WDM are Windows OS-specific audio drivers (which always see the USB inputs and outputs as stereo pairs). I say a few words about Windows audio at the end of this post.
In the X32 I have configured a loopback between Digital signal OUT (the incoming audio) and Digital signal IN (the outgoing audio) for the first 8 channels of the X32 (because the other channels are using the physical inputs and connected to my microphones, instruments, etc. As a result of the loopback, if I play a mp3 with MediaPlayer, then the audio it will be send Digital signal OUT (channel 1 and 2 by default) but is directly fed into Digital signal IN (channel 1-2) and returned to Recording Device IN 1-2, which I then can record in Cubase. In such scenario, the monitor function of the Cubase channel that we are recording on should be turned off to prevent an infinite audio feedback loop.
Computer audio routing for streaming (using two audio interfaces)
Update 24 December 2023: For unknown reason this setup is currently not working. Once Zoom has started, Zoom keeps switching between the UR44C and X32 audio devices (causing audio dropout). If I look in the audio device manager, it seems that the URC44 device gets disabled when switching to the X32 device. I tested many things but at this stage it is not clear if this is a problem with the UR44C software/drivers (i did a fresh install), or if this is a problem with Zoom. There are numerous reports of Zoom users that report about this audio switching. To be continued……
Update 26 May 2024: I did some further testing. I updated the drivers, the dspMixFx program, and the firmware. But now I get USB connection errors. A Google search learned that many users are facing this problem, which remains unresolved. Many of these users switched to another audio interface. I have also given up. The principle below will also work with other audio interfaces that have loopback functionality.
Update 1 June 2024: I have replaced the Steinberg UR44C with a Focusrite Scarlett 4i4 4 gen audio interface. See below for changes in setup.
So, what is the problem with Zoom? In its normal use I would configure Zoom to use my Rode USB microphone as its input, and the X32 OUT 1-2 as its output. However, if I want to stream any audio (e.g., from Cubase) to Zoom then I should select the X32 IN 1-2 as its “microphone” input. This works fine and the participant on the other side of the world will enjoy your Cubase project. However, I can no longer talk to him/her because the USB microphone is no longer connected to Zoom (Zoom allows to only use a single input device). Also the X32 loopback does not help in this case.
What about using a microphone connected to the X32 instead of the Rode USB microphone? Both the Cubase audio and microphone signal will be send to the computer but again we cannot select both in Zoom because the computer audio will be on a different USB channel (X32 IN 1-2 in my case) than the microphone (X32 IN 30). Of course I can sum the computer audio and the microphone to a mixbus on the X32 but these mixbusses are not visible as a Recording Device (i.e., they do not feed into the X32 audio interface).
This Window audio architecture also prevents that we can stream audio directly between applications, e.g., we cannot directly connect RealStrat (MusicLab) to Amplitube 5 (IK Multimedia) because with the loopback this results in an audio feedback loop, while without the loopback the output of the first application will not be streamed to the second application. In such scenarios ASIO4ALL, Virtual Audio Cable, or VoiceMeeter might offer a solution. Although this works (also for combining the USB microphone and (Cubase) audio into Zoom, I never liked to use these applications (but this is really personal and subjective). I wanted to have a solution that would only require to select the proper input/output in Zoom.
One other solution to stream both your microphone and audio to Zoom (or any other application), is to use a second audio interface, for which I use the Steinberg UR44C (Figure 3).

Figure 3. Audio configuration for streaming using two audio interfaces (X32 and UR44C). Note that I don’t use any of the physical outputs of the UR44C. I only use UR44C physical input 3-4 because this handles line signals (input 1-2 (mic/Hi-Z) are for microphones and guitars). Finally, in this setup the UR44C OUT 1-2 is not used.
Now, the configuration becomes little more complex. First of all, for streaming via Zoom I do not use the Rode USB microphone in this scenario. Instead I use my Rode NT5 on (fader) input 30 of the X32 mixer (this also allows use of the X32 EQ, compressor, and reverb on the microphone signal; Figure 4). Next I sum fader input Channel 30 (microphone) and fader inputs 1-2 (computer audio) to X32 mixbus 11-12 which is routed to physical X32 output 11 and 12. These two outputs are connected to the physical inputs 3-4 on the URC44 using two jack cables. Now we have the combined microphone and computer audio on the UR44C IN 1-2 which visible as the UR44 IN 1-2 Recording device. This can now be selected as input for Zoom.
Fader inputs 1-2 (computer audio) are also routed to mixbus 3-4 that are routed to the physical X32 outputs 3-4, which are connected to my monitor speakers (Kali-IN8, or headphones). The output of Zoom is set to the X32 OUT 3-4 Playback Device (not 1-2) which are faders 3-4 on the X32. Fader input 3-4 are also routed to mixbus 3-4 (studio monitors) but not to mixbus 11-12. Consequently, I can hear the what the other participant is saying while at the same time preventing an audio feedback loop. That is, this will prevent that the other Zoom participant will hear his/her own voice back.
In this configuration, the UR44C loopback should be on (either Live Cast or Voice Cast). To understand this, we need to realize that the architecture of the UR44C differs from the X32. The loopback function of the UR44C does not only transfer the Digital Out to the Digital In but also adds the audio coming from the physical inputs other than 1-2. By default the Windows Recording Device will only see UR44C IN 1-2 which corresponds to Physical Input 1 and 2 (this is a Mic/Hi-Z input). However, I have connected the X32 to Physical Input 3 and 4 because this is a Mic/Line input, and will be on USB channel 3-4 and thus not visible by Windows. However, engaging the loopback will sum input 3 and 4 to 1 and 2 (which are not connected in this setup). Consequently, also physical input 3 and 4 will be playing on Recording Device UR44C IN 1-2. Update: 26 May 2024: in the latest version of the software the Live/Voice cast menu has been removed in virtue of three faders (DAW, Music, Voice) that should provide the same functionality. I have not tested this.
Now, if I want to stream my Cubase audio to Zoom, then I still configure Cubase to use X32 OUT 1-2 (such that I hear it on my studio monitors through mixbus 3-4) but will also find its destination via mixbus 11-12 to the UR44C IN 1-2 Recording Device. Note, that in this scenario I don’t have any physical output of the UR44C connected nor do I use the UR44C OUT 1-2.

Figure 4. Configuration of the X32 digital mixer. In my configuration the first 8 inputs are reserved for USB communication (input and output) with the computer and, hence, nothing is attached to their physical inputs. For these first eight channels the loopback is active, thus everything send out by the computer comes back on any of the first 8 faders. USB OUT 1 – 2 (fader 1-2) is send to mixbus 3-4 (routed to physical outputs 3-4), and mixbus 11-12 (routed to Physical Output 11-12). The output of Zoom enters the X32 on fader 3-4 via USB OUT 3-4, which is only routed to mixbus 3-4. The microphone, attached to the physical XLR input 30, is send to mixbus 11-12 which is routed to physical output 11-12.
Update 1 June 2024: Changes I made in my setup. I have replaced the Steinberg UR44C with a Focusrite Scarlett 4i4 4 gen audio interface.
I made a slight change in my setup: In addition to the physical outputs (channel 11 and 12), I now also have connected the microphone directory to the Scarlett. One advantage is that it is easier to balance the levels of the microphone and other incoming audio from channel 11/12. The Loopback on the Scarlett works differently compared to the UR44C. All incoming audio from the physical inputs or virtual inputs (i.e., computer audio) is routed to the Loopback channel (5/6). See Focusrite Scarlett 4i4 for the details.
X32 Routing schemes


Figure 4. X32 configuration. For completeness some details about the X32 configuration. (1) First 25 input channels and send busses. (2) Input channel 26-32 including the microphone channel which is connected to the PRE-73 Premiere microphone pre-amp. (3) Mixbusses. (4) Configuration of the microphone channel 30 (Gate, EQ, Compressor). (5) The first four effect modules of which I use the Vintage Room reverb on Channel 30.
Figure 5 shows the settings of the UR44C dspMixFx mixer. The configuration of Zoom is explained below.

Figure 5. UR44C Mixer setting for streaming. Note that the loopback should be set to Live Cast or Voice Chat.
Configuration of Zoom for streaming

Figure 5. Zoom audio configuration for streaming
In advanced settings (via settings accessible from Zoom website):
- Allow users to select stereo audio in their client settings
In audio settings
- Select the correct input and output device
- Select high fidelity music mode
- Select Stereo audio
- Select Echo cancellation (when not using headphones; but you may want to try which gives the best results)
Very important is to turn on “Original sound for musicians”. You see this option in the upper left corner once you started a Zoom session. This should be turned on by all participants in the session! Also note, as explained above in Figure 2, that to save bandwidth you may want to reduce your bit depth and sample rate (if possible on your computer)
The person that you will stream to, also needs to do some configuration:
- (S)he should download Zoom from [here] and install the program.
- In the Zoom audio settings, (s)he should select ‘Original sound for musicians’ and, subsequently, enable
- High fidelity music mode
- Stereo audio
- Echo cancellation (when not using headphones).
- In the video screen (next to the green icon) the ‘Orignal sound for musicians’ should say ‘on’. If not, it should be turned on by clicking on it.
- Finally, the sound device of the laptop/desktop may some further configuration. In order to not use too much bandwidth, the audio devices should be set to 16 bit / 44.1 kHz.
- On Windows 10/11 this can be done as follows:
- Go to the Windows Settings –> System –> Sound. Then select the device and make the changes;
- Alternatively, open de Sound panel running mmsys.cpl (search for this program, and then execute). In the Sound panel, right click on the device and select properties. In the Advanced tab, you can make the required changes.
- Select the audio device you want to use, and then set to 16bit/44100 Hz
- On some laptops/desktops you can set this for the input device (microphone), the builtin speakers, and the connected headphones.
- On Windows 10/11 this can be done as follows:
Alternative streaming setup using only the UR44C
Sonobus
SonoBus is a free and easy to use application for streaming high-quality, low-latency peer-to-peer audio between devices over the internet or a local network. It allows you to make music with others over the internet. SonoBus is relatively simple to use and can be setup as a standalone application, as a VST3 plugin (in Cubase), or integrated with OBS (see below and [here]). The latest version of SonoBus also facilitates video (share screen, webcam). Alternatively, it can be run next to Zoom.
In the audio setup I can choose one or more stereo/mono input and output channels from my audio interface. In case you want to use input/outputs from multiple (ASIO) devices then you can use ASIO4ALL (see below).

Below you see the user-interface of SonoBus. You can stream as a mono, stereo, or multi channel. In addition, your can simultaneously play audio files from the SoundBoard or loaded into the lower panel. You can chat with the participants, add Reverb, and much more.

SonoBus monitoring
The monitor slider in the top right is used if you were doing software monitoring of your inputs to the main outputs. There are individual monitor level controls for each input on the right side of each input group in the Input Mixer area (it’s a purple radial control), the main one in the top right of the window is an overall monitor level. The main output slider at the bottom is just an overall volume control for anything you have going to the main outputs of the app/plugin (the main mix, etc).
Adding video
If you want to add video, you can run Zoom in parallel.
OBS
Open Broadcaster Software (OBS) is a free and open source solution for offline video recording and live streaming (to e.g., YouTube that is Mac and Windows compliant. With an open canvas approach to video creation this tool can mix a variety of audio and video and other sources to a single output for creative video and broadcast applications. Sonobus can run as a VST2 plugin inside OBS (see [here]).
 OBS integrated with Sonobus as a VST2 plugin
Virtual Audio Cable and VoiceMeeter
Virtual Audio Cable, or VoiceMeeter from VB-Audio that help to setup more complex audio configurations and also may facilitate your streaming setup. The principle of the virtual audio cable is shown below. The virtual cables (Cable Input and Cable Output in the image below) are basically audio devices. These virtual cables allow to connect applications together. That is, the output of the first application will be set to Cable-A Input, while the input of the second application is set to Cable-B-Output. In this way it is possible to connect, for example, Realstrat (MusicLab) to Amplitube 5 (IK Multimedia) outside a DAW (see [here]). For certain streaming applications these virtual cables may find its use.

VoiceMeeter is Audio Mixer Application endowed with Virtual Audio Device used as Virtual I/O to mix and manage any audio sources from or to any audio devices or applications. This application can be used to mix, for example, inputs of your audio interface with music from software applications and stream it to Zoom. As such it can provide an alternative to the setup with two audio interfaces that I described above.

ASIO4ALL
ASIO4ALL is a low latency ASIO (Audio Stream Input Output) driver for Windows Audio. It is a hardware independent ASIO driver for WDM (Windows Driver Model) audio devices. It uses WDM Kernel-Streaming and sometimes even more sophisticated methods to achieve its objectives. A nice feature of ASIO4ALL is that it allows the simultaneous use of WDM (ASIO) Devices. Thus, if you have two audio interfaces, you may select one ASIO device as input for one application and use another ASIO device as output for a second application. Also this allows to connect applications together and might come handy for certain streaming applications. Below the ASIO4ALL configuration interface showing multiple audio devices including my X32.

In case you want to use multiple (ASIO) audio devices you may need to disable “Allow applications to take exclusive control of this device” in the Sound Control Panel. However, this can give strange behavior of some audio applications.

Windows Audio
Some words about Windows audio, on which I am not an expert at all.
MME (Microsoft Multimedia Environment), WDM (Windows Driver Model) and WASAPI (Windows Audio Session API ) are Windows drivers. MME is often the default selection since it is supported by most Windows OSs (MME was released in 1991). If you select any of these types your audio is passed to the OS which then hands it on to the interface. Between DirectSound and WASAPI there is not a big difference, as DirectSound is basically just a DirectX-related Interface to the Windows Audio Session API (WASAPI) underneath. WASAPI features the lowest latency of all (by design) and therefore should be preferred for recording (especially when it comes to multi-track).
ASIO (Audio Stream Input/Output) works differently as it allows the application (e.g., DAW) to communicate directly with the hardware interface, without the OS as intermediary. This can give excellent low latency performance but it also explains why they tend not to be multi-client: the idea is that the application completely takes over the interface, which means only one app at a time. Note that ASIO4ALL solves this issue.
The difference between WDM-KS and WASAPI is that the former has a lower-level interface for enumerating and configuring devices. But when it comes to the audio buffers themselves, both should provide direct access to hardware memory (if applicable).
ASIO, WASAPI Exclusive, and WDM-KS are all bit-perfect as far as a typical software stack is concerned, so there shouldn’t be any difference between them. MME, DirectSound and WASAPI Shared do not provide bit-perfect guarantees.
